Quick Navigation
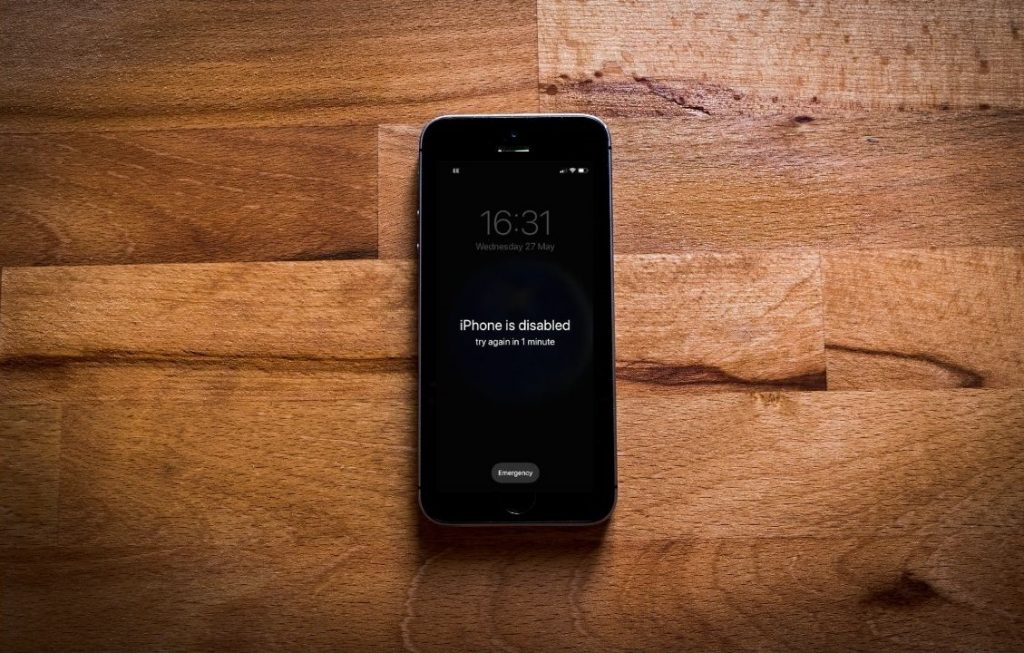
The “iPhone Disabled Connect to iTunes” is an error that comes up when a user attempts the wrong passcode too many times.
It gets frustrating when you cant do more than just look at your screen and figure out what the passcode could be.
The iPhone Disabled Connect to iTunes error has been reported by many iPhone users.
In this article, we demonstrate how to fix a disabled iPhone using iTunes or iCloud.
How to Fix Disabled iPhone?
When you try too many wrong attempts, iPhone gets disabled.
There is not any trick or shortcut that you can try to remove iPhone disabled connect to iTunes on your iPhone.
The only way you can fix the “iPhone disabled connect to iTunes” error is to use iTunes software using macOS or Windows.
The “iPhone disabled” warnings can come for certain periods if wrong attempts increases.
To unlock your device you might need to wait between 5-60 minutes.
If you are unable to unlock your iPhone then there will be certain steps to unlock your device.
Why is my iPhone disabled?

iPhone never compromises on their security concerns therefore you can not do what can be done in an Android.
When too many attempts get wrong, you will start seeing a prompt message that iPhone is disabled.
Then you will be unable to perform any process.
iPhone disabled connect to iTunes FIX
To fix the “iPhone disabled connect to iTunes” error on your iPhone you need to have the following stuff with yourself.
Pre Caution: Make sure that you remember the credentials of your iCloud account. If you don't remember the credentials of your iCloud account, you won't be able to do anything after the process.
1. Download iTunes
So let’s just start step by step.
First, you need to make sure that you have the latest version installed on your computer.
If you don’t have you can download the latest version of iTunes fromhere.
2. Connect your Device
Once you have downloaded and installed the latest version of iTunes.
You need to attach your device to your computer with the lightning cable.
iPhone 6 or older:Turn off your device, hold the home button and plug in the data cable or lightning cable simultaneously. You will be booted into recovery mode and iTunes will automatically be launched on your PC.
iPhone 7/8 or 7/8 Plus:Turn off your device, Plug in the data cable and hold the power button and volume down button at once until your device gets into recovery mode.
iPhone X or later:If you have iPhone x or later versions you need to press the Volume Up button, press the Volume Down button, and hold the power button until you see the Apple logo on your screen.
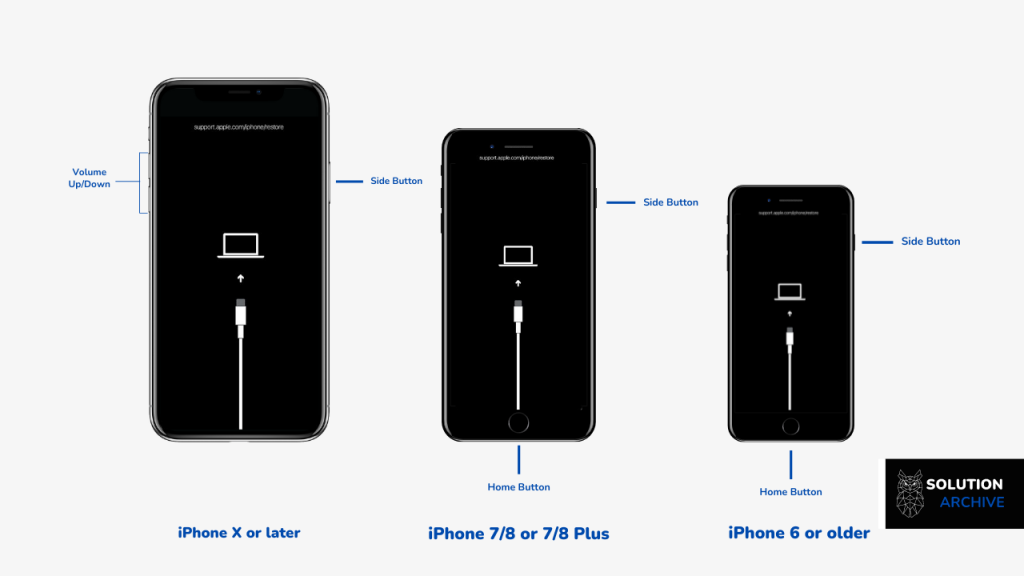
These steps will enable us to connect our iPhone with the computer.
Once the steps above are completed then you need to head over to your computer screen, place your phone in a place where it should not disconnect from your computer.
3. Head over to iTunes and Restore
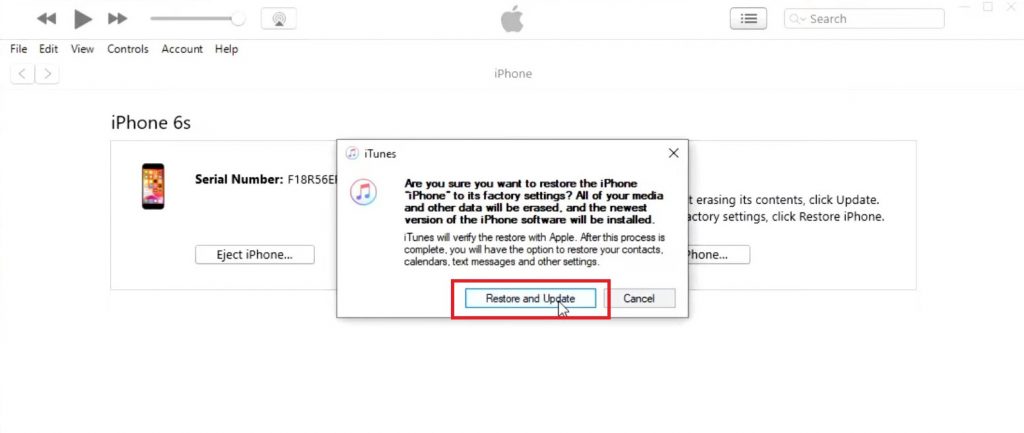
You will see on iTunes that your phone has been connected successfully.
A prompt message will appear stating that there is a problem with your iPhone that requires it to be updated or restored.
Now there are only two actions that can be performed.
- Update
- Restore iPhone

Select theRestore iPhoneoption, and then tap on theRestore and Updateoption.
After completing and agreeing on the terms and conditions, iOS will start downloading.
It will be approximately 4-6GB in size.

After the download went successfully.
The process ofrestoringthe iPhone will take time according to your iPhone model and its OS.
But usually, it does not take time more than 20 minutes.
Once the Reset process is done, your iPhone will be in a fresh new condition.
If you want to get your data back, please stop right here and don’t do anything yet, read the next paragraph.
Now clear the startup processes. Your iPhone is now unclocked, and you have successfully fixed theiPhone Disabled Connect to iTuneserror.
How to Fix iPhone Disabled Connect to iTunes without erasing data?
No one wants to remove their memories with their loved ones.
So my priority will be to demonstrate to users every possible way to get their data back.
I have concluded that you can only get your data back if and only if you have backed up your data using iCloud or your computer.
So, there are two ways in which you can try to get your data back.
- Restore backup from iCloud
- Restore backup from computer
1. Restore backup from iCloud:
In this step, I will demonstrate to you that how you can recover your data from iCloud.
If you have reset and erased your iPhone, your phone will be in fresh new condition. Follow the steps below.
- Connect your device to a network.
- In startup windows (After the reset process), you will see a screen where you will find an option,restore data from iCloud.
- Tap on that option.
- Log in to your iCloud account.
- If any backup is found in iCloud your device will start recovering your data from that backup.
- You just need to wait till it finishes.
Once the process is done, your device will be back at its previous state.
Note: If you can’t find certain images or files, then there are two possibilities.
- Your backup is old.
- Recovering process is still in the process, and you just need to wait.
2. Restore backup from Computer:
This step will only work if you ever backed up your iPhone on your computer.
In this step, I will demonstrate to you that how you can recover your data from the computer.
If you have reset and erased your iPhone and you need your data back please follow the steps.
- Make sure that you are still connected to your computer via Lightning cable.
- In startup windows, you will see a screen where you will find an option,restore data from the computeralong with several other options.
- Tap on therestore data from the computer.
- Now you need to head over to your computer’s screen and tap on the little icon at the top right of iTunes software.
- Now you will see an option there “Restore iPhone from the drive“.
- Tap on theRestore iPhone from the drive.
Your device will go in Restore mode, and once it is done, your device will be back in its previous state.
You will have your data back.
Bottom Line
If you have not backed up your iPhone using iCloud or iTunes, then recovering your data back will never be possible for you.
In the future, if there will be any way of recovering the user’s data back, I will update this article and put that method into this.