Quick Navigation
Changing your computer’s DNS can resolve many issues. For example, if you are a parent who wants to block some content, you can do it by changing the DNS.
If you want to have a good speed internet connection either you can have reliable and fast internet connection from various companies like Spectrum which gained the popularity due to Spectrum internet cost or you can change your DNS to improve your internet connection speed.
Changing can also improve your online privacy and security, and internet browsing speed as well.
You can change the DNS server on your router, or you can set DNS individually on any device.
What is DNS?
The DNS (Domain Name System) is a service that allows you to type in a familiar domain name like Facebook.com on the internet to visit a website.
Without a DNS, surfing the internet would be a nightmare to use.
When you type a domain name or website URL, it converts that domain name to an IP address which your browser can easily understand.
You might have heard that anyone can trace locations based on IP addresses because every device on the internet has a unique IP address to communicate with each other.
It means an IP address holds an address of a domain name.
However, DNS servers are like a mechanism that helps the computer translate a friendly domain name to an IP address (i.e. http://192.268.2.2).
For example, if you want to access our website, you need to type our web address https://solution-archive.com on your browser.
The browser will send a request to your DNS server to change that web address into an IP address, and when the IP address is found, a browser then connects to that site and download the resources from the website.
A DNS server is already assigned to the user from their Internet service provider, but you can change it to anyways.
However, in the guide, we will describe to you some ways to change the DNS on your PC, Mac or Windows.
How to change DNS Server on Windows 10?
To change the DNS servers on Windows 10 using the control panel, follow the steps below:
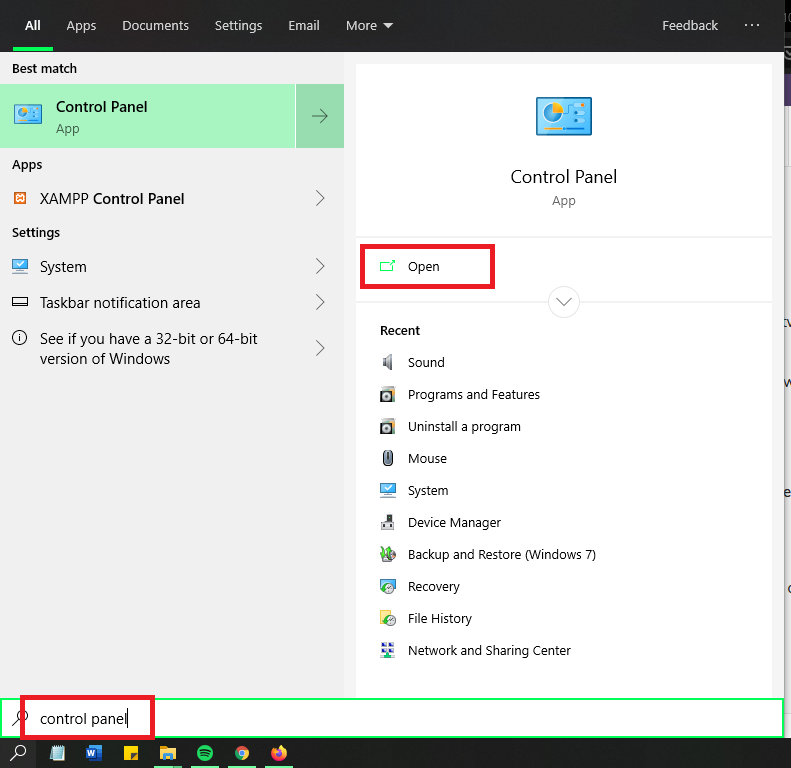
- Click on search and typeControl Panelon the search bar and enter.

- Select theNetwork and Internetoption.
- Tap onNetwork and Sharing Center.
- On the top left panel, click onChange Adapter Settings.
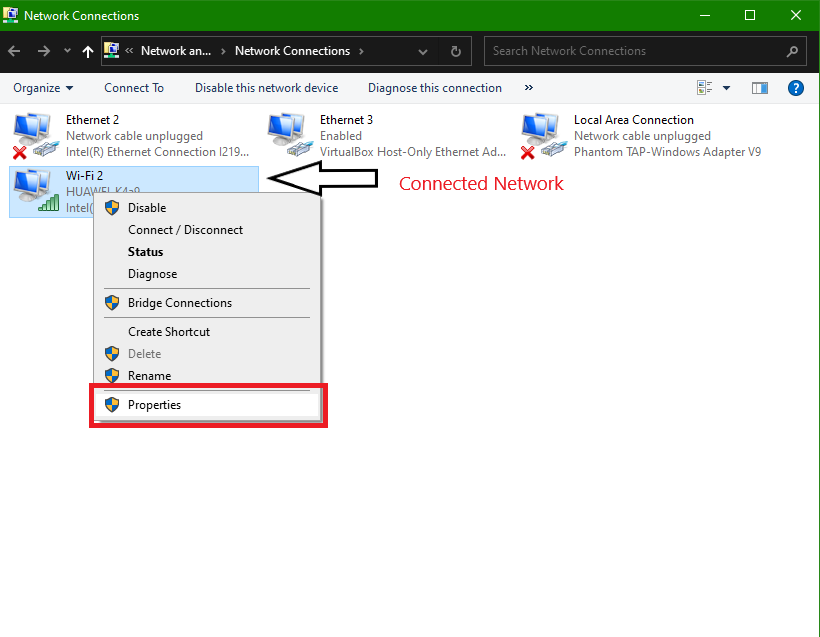
- Right-click on the network panel that connects your Windows 10 to the internet (in my case, I am using Wifi).
- Go to the Networkproperties.
- Now select and check the Internet Protocol Version 4 (TCP/IPv4), and click on the Properties option.
- Select and check theUse the following DNS server address.
- If you want to set your DNS server to Cloudflare, Google Public DNS, or Cisco Open DNS, you can set the following DNS servers:
- Cloudflare:1.1.1.1 and 1.0.0.1
- Google Public DNS:8.8.8.8 and 8.8.4.4
- OpenDNS:208.67.222.222 and 208.67.220.220
- Now type your preferred DNS server and hitOK.


So, if you have done these steps, your device will now be using the DNS servers you have set.
How to Change Your DNS Server on a Mac?
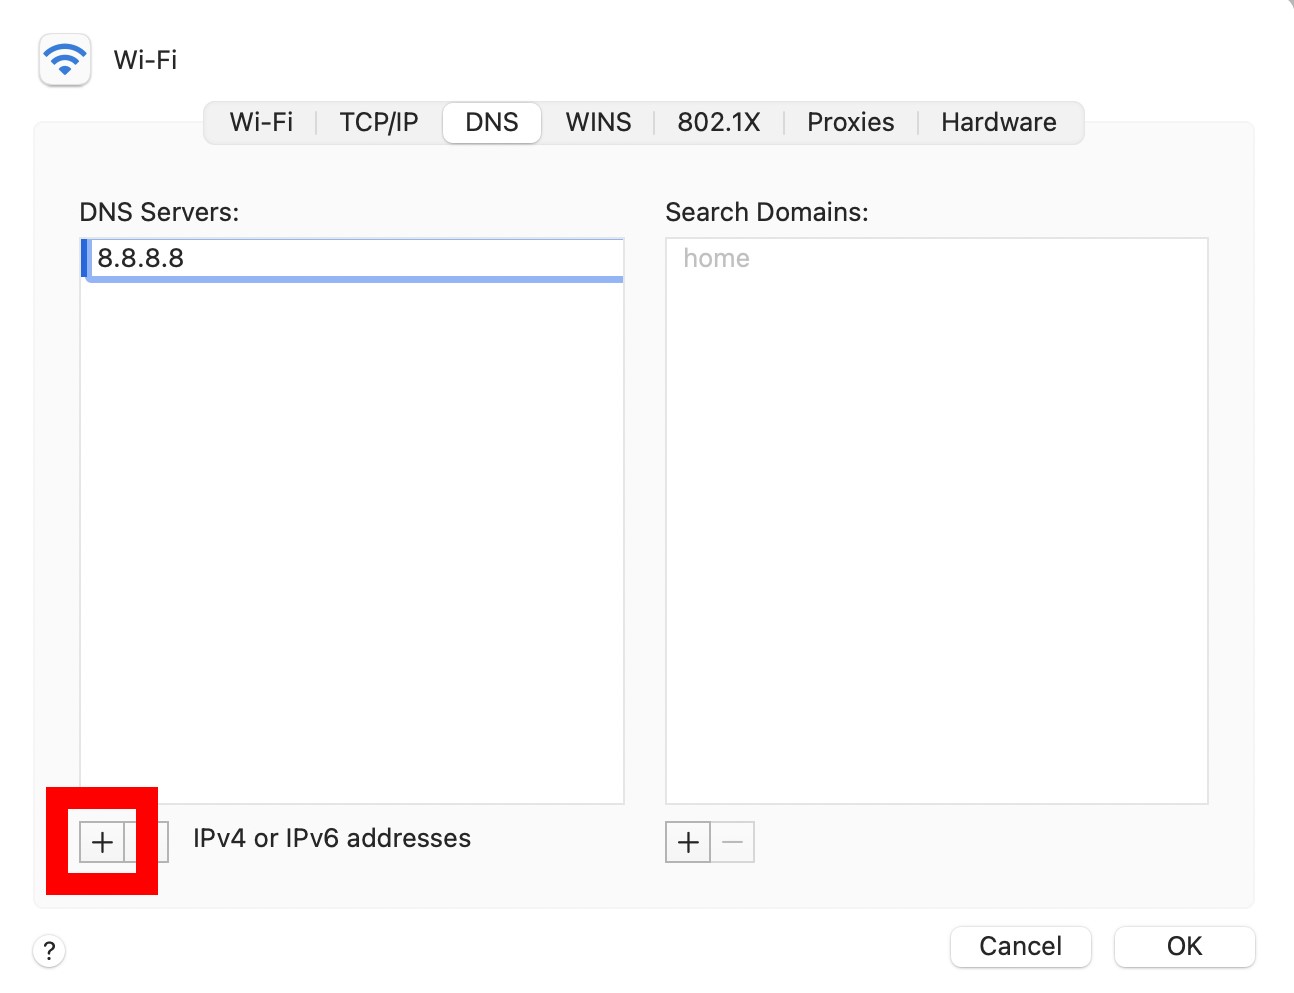
To change the DNS server in Mac, follow the steps below:
- On the top left corner, Tap on Apple Logo.
- Select System Preferences.
- Now select the Network option.
- Select on the network panel that connects your Mac to the internet (in my case, I am using Wifi).
- Next, click onAdvanced.
- Now, select the DNS Tab on your Mac Screen.
- Next, select the Plus button (+) at the bottom left corner.
- Now, you can change your DNS servers.
- If you want to set your DNS server to Cloudflare, Google Public DNS, or Cisco Open DNS, you can set the following DNS servers:
- Cloudflare:1.1.1.1 and 1.0.0.1
- Google Public DNS:8.8.8.8 and 8.8.4.4
- OpenDNS:208.67.222.222 and 208.67.220.220
- Once you’re done, click onOK.
- Finally, click onApplyto save the changes.


Once you’ve changed your DNS settings, your browser will automatically switch to the new DNS server.
How to Change DNS Server on Android?
Android does not allow the change of the DNS server system Wide.
You have to change the DNS servers of each wifi network connected to your device.
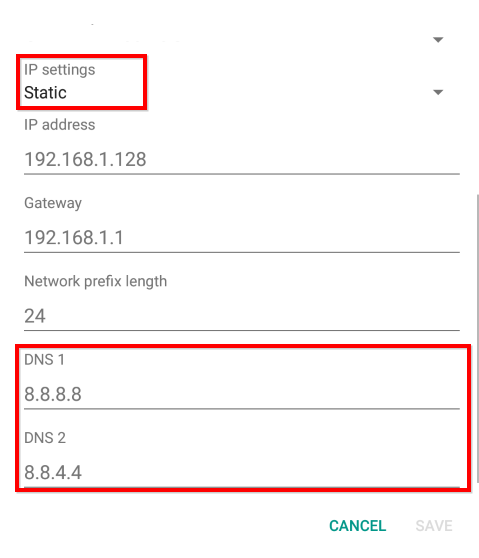
To change the DNS server on an Android device, follow the steps below:
- Go to the Wifi Settings.
- Hold the Connected Wifi Network.
- You will see options there; selectModify Network.
- Change the IP settings toStaticfrom the DefaultDHCPserver.
- Next, Type your preferred DNS server in the section “DNS 1” and “DNS 2“. You can also set your DNS server to these popular servers:
- Cloudflare: 1.1.1.1 and 1.0.0.1
- Google Public DNS: 8.8.8.8 and 8.8.4.4
- OpenDNS: 208.67.222.222 and 208.67.220.220
- Click Save Apply Changes.

How to Change DNS Server on iPhone or iPad?
Apple also allows users to change the DNS servers but not system-wide, just like Android, which means you have to set the DNS of each network that your iPhone or iPad has connected to.
Follow the steps below to change the DNS servers on iPhone or iPad:
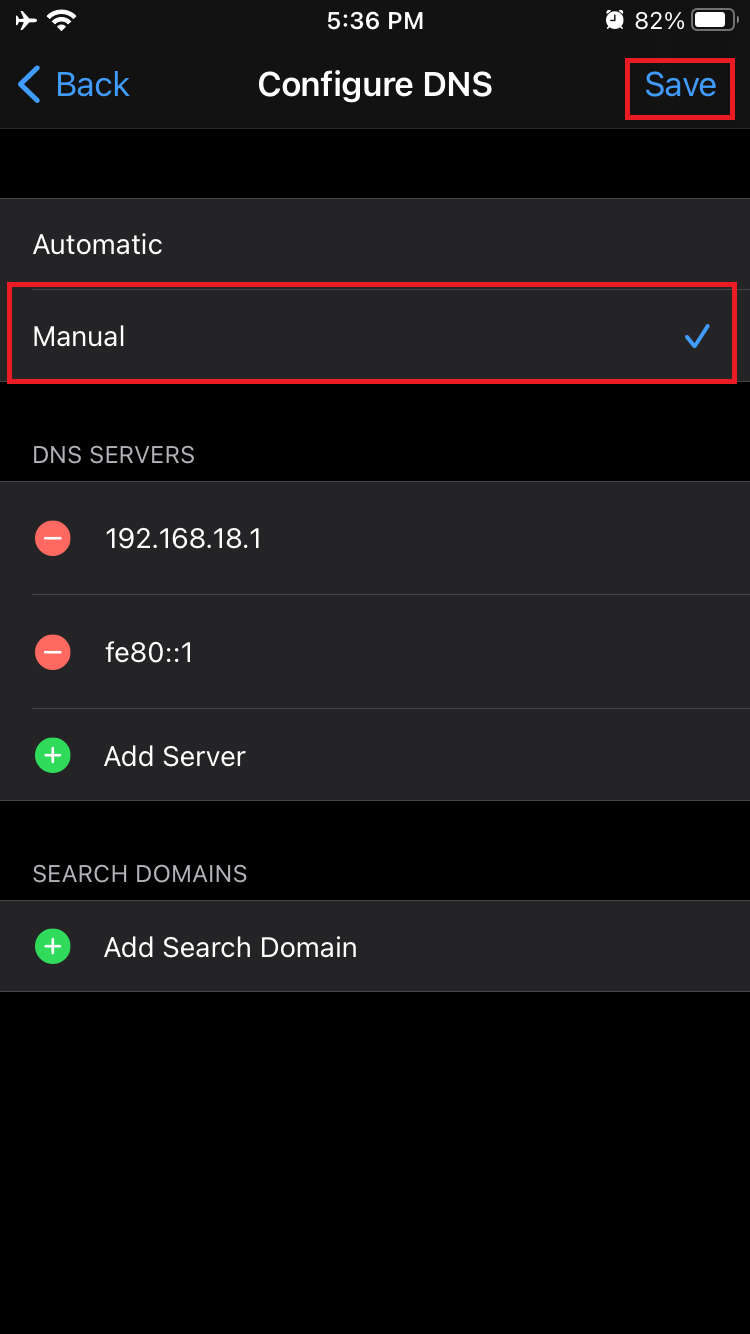
- Go to the Settings and tap on wifi.
- Now Click on the Exclamatory icon along with the connected network (i).
- Scroll down and select the Configure DNS option.
- Set the settings from Automatic to Manual.
- Now type your Prefered DNS server.
- You can set your preferred DNS to these popular DNS servers:
- Cloudflare: 1.1.1.1 and 1.0.0.1
- Google Public DNS: 8.8.8.8 and 8.8.4.4
- OpenDNS: 208.67.222.222 and 208.67.220.220

Conclusion
There could be multiple reasons why you might need to change the DNS server of your device.
So, these were the most straightforward possible steps to change the DNS server on your PC, Mac, Android, or iPhone.
Now that you know how to change the DNS server on any device, whether Windows, MAC, Android, or iPhone and iPad, follow our next posts to learn more about problems and their solutions.